Overview
Page filters can be configured on template and dashboard layouts and tied to specific sections so all sections on a page react to the same filter values. Additionally, the Page Filter Panel can be leveraged to manage Page Filters from a single point of contact. Individual user Page Level Filter selections will remain until a full browser refresh.
Note: When a dashboard with a page filter is used as a slide in a presentation, the page filter will not be available in the presentation. As a best practice, do not use dashboards with page filters as slides in your presentations.
Page Filter Panel
The Page Filter Panel is accessible by selecting the Filter icon on the right side of the filter bar. Selecting the icon will open the Page Filter Panel, from here you have access to all page filters currently configured on the tab.

From the Page Filter Panel you can add, edit, delete, reorder, and reset the values of Page Filters. Additionally, the Filter icon displays a number indicating how many Page Filters are currently being applied to sections on the page.
Adding Filters
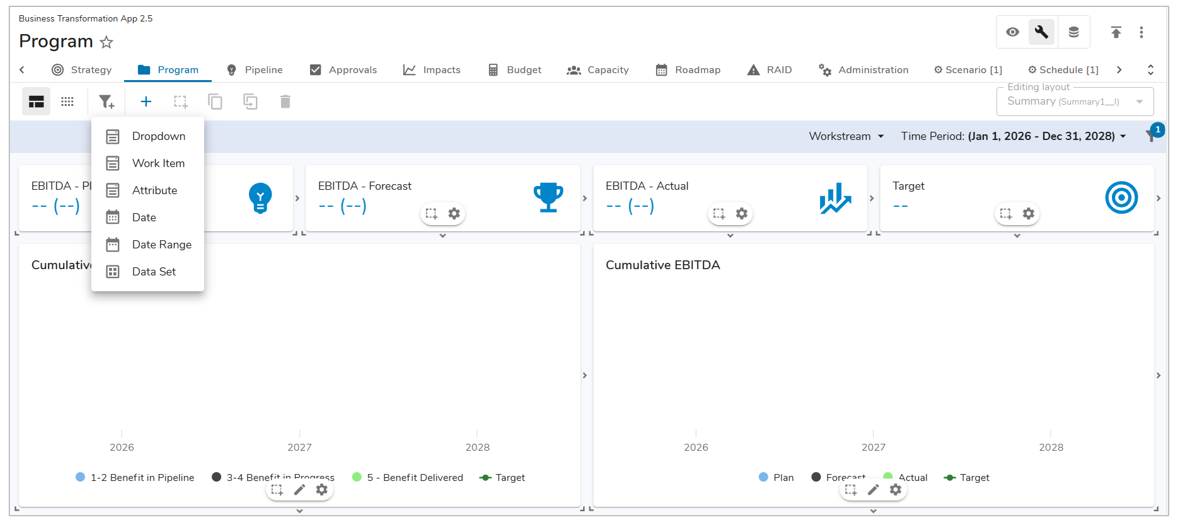
On a template, toggle into Configure mode. On a dashboard, first reveal the toggle buttons by clicking on the action menu in the upper right corner of the page and clicking Configure. Then, toggle into Configure mode.
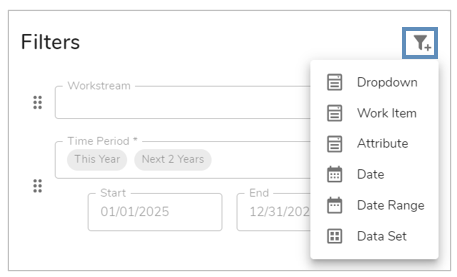
Click on the filter icon in the toolbar to add the filter bar to the page, choose a filter option to launch a configuration dialog.
Add a label for the filter (the name of the filter that will be displayed) and adjust the auto-populated API name if desired.
When multiple filters are added to the filter bar, they can be rearranged by dragging and dropping them in a new order.
Page Filter Panel Counterpart
Selecting the Filter icon will open the Page Filter Panel, which also supports the creation of new Page Filters. Click on the ‘Add Filter’ button and select the intended Page Filter type, configure the filter as desired.
Page Filters can be rearranged within the Page Filter Panel via the grabber icon, dragging and dropping them in a new order.
Dropdown Filter
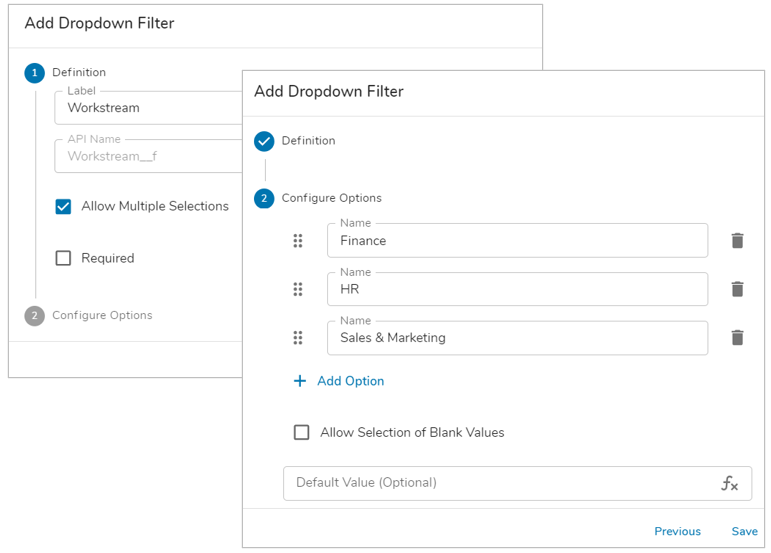
The Dropdown Filter allows you to build a static list of options.
- Define a label. Optionally, edit the API name that will be used to reference the filter in sections.
- Define whether users should be able to select one or multiple options from the filter and if the filtered is required.
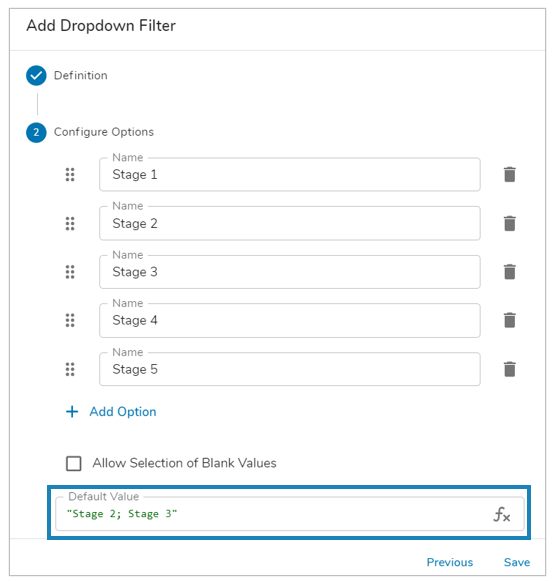
- Click Next and add the options that will appear in the dropdown. Drag to reorder, or click the trash can to delete options.
- Select the ‘Allow selection of Blank Values’ to include the (Blank) option on the dropdown page filter.
- Define a default value if desired and save.
Work Item Filter
The Work Item Filter displays a list of work items that dynamically updates as items are created or deleted.
- For a Work Item Filter, define a label to propagate the API Name and ID API Name.
- Select the Filter Context from the dropdown menu. Once a Filter Context is selected, the Work Item dropdown will generate any work item types that reside under the Filter Context.
- After a Work Item type has been selected, define whether multiple selections are allowed and if the filter will be required. Click Next.
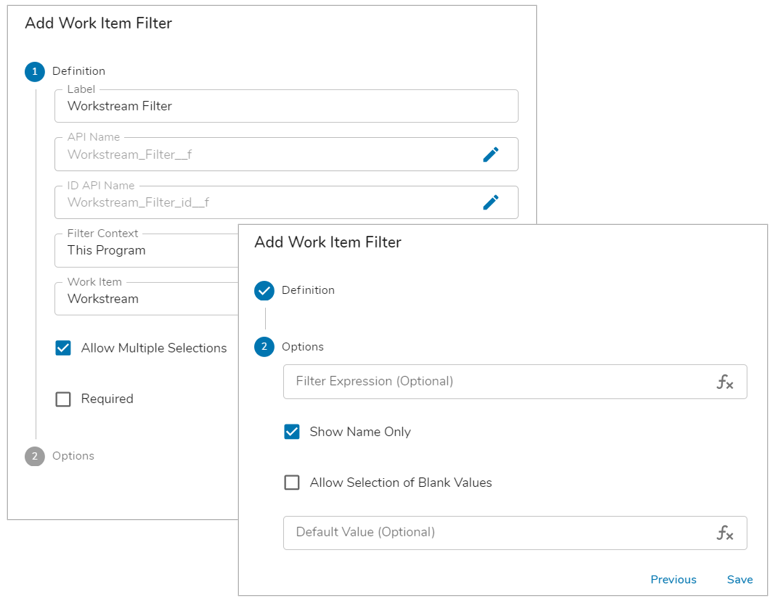 Optionally, enter a Filter Expression to filter down the list of work items that will be displayed.
- Finally, check whether to Show Name Only, if not then Auto ID and breadcrumb trail will be visible for each work item. Check the ‘Allow Selection of Blank Values’ to provide the page filter with the ability to filter on (Blank).
- Define a default value if desired and Save.
Attribute Filter
The Attribute Filter allows users to select a Pick List attribute to dynamically pull in values, including a blank option. 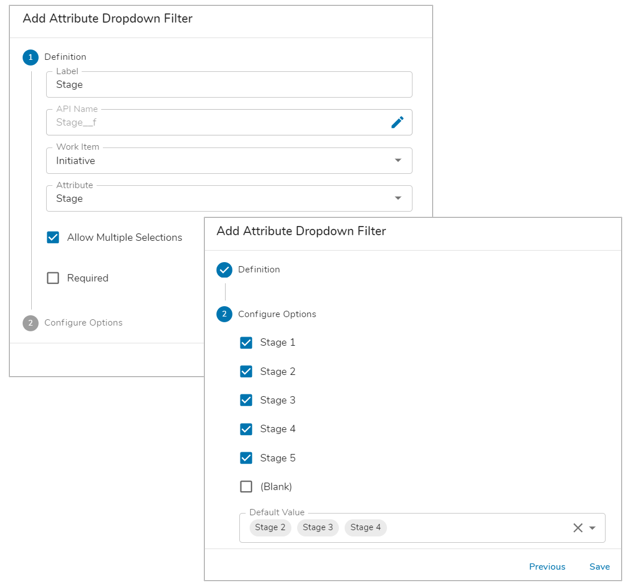
- Define the Label to propagate an API Name.
- Choose the desired template from the Work Item drop down field, this will define which Pick List attributes are available for selection.
- From the Attribute drop down, select a Pick List.
- (Optional) enable Multiple Selections or make the page filter Required. Click Next.
- Use the checkboxes next to each Pick List option to choose which options display on the page filter. A Default Value for the page filter can also be selected, if the filter is Required a default must be selected. Save.
Date Filter
The Date Filter allows users to select a single date via a calendar.
- Define the label, whether there will be a default value and if the filter will be required or not.
- Save.

Date Range Filter
The Date Range Filter allows for the filtering of data based on a range of dates.
- Define the Label and optionally edit the Start/End API names. As well as whether the filter will allow multiple selections and/or will be required.
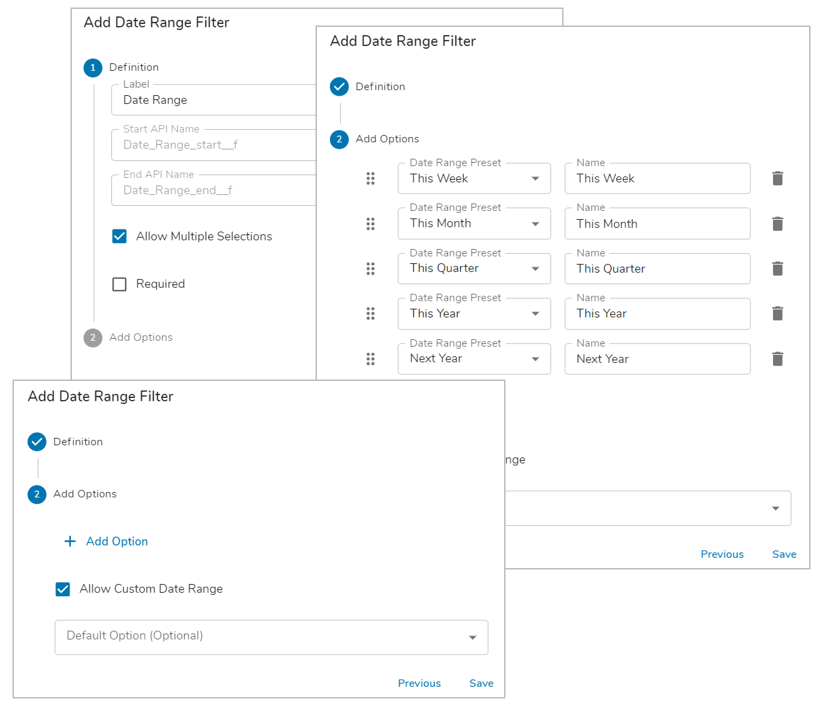 For each option, select one of the options from the pick list (Day/Week/Month/Quarter/Year – Last N/Last/This/Next/Next N) to define a Date Range Preset, optionally edit the name of each.
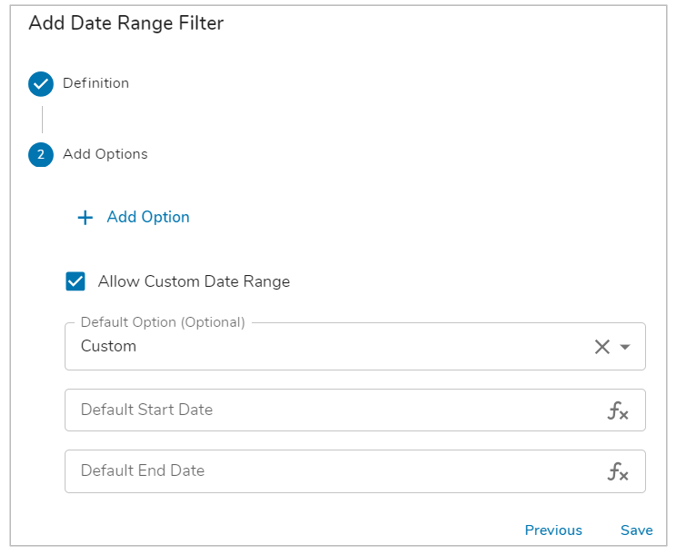
- Select the Add Option button to define another preset option. Optionally select whether to allow a Custom Date Range to be defined (this allows users to select a range via a calendar), as well as a Default Option that is shown on page-load. To only filter by a Custom Date Range, leave the Options blank (Multiple Selections and Required must be disabled to do so) and ensure Allow Custom Date Range is selected.
Notes:
- When configuring a Date Range page filter with only a Custom Date Range, you can set a default value by choosing the ‘Custom’ option in the dropdown. This will result in two new required fields to be entered: Default Start Date and Default End Date. This will result in the date range shown upon page load.
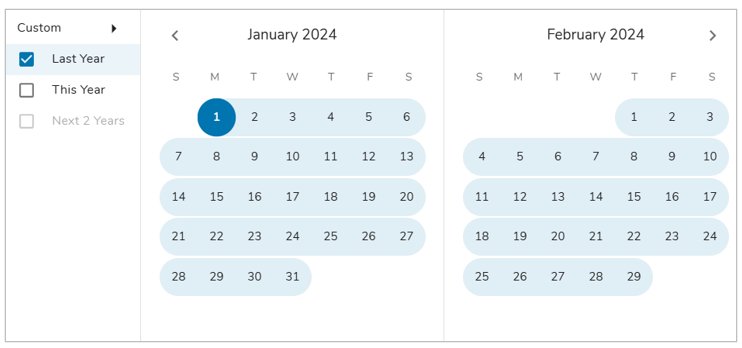
- When using a Date Range filter with multiple selections allowed, any options that would not produce a contiguous range with the first option selected will be greyed out as seen in the screenshot below.
- A Section Refresh is required when a work item is added under a date range filter that does not match the options of said filter. I.E., A February date is entered under a January filter.
Data Set Filter
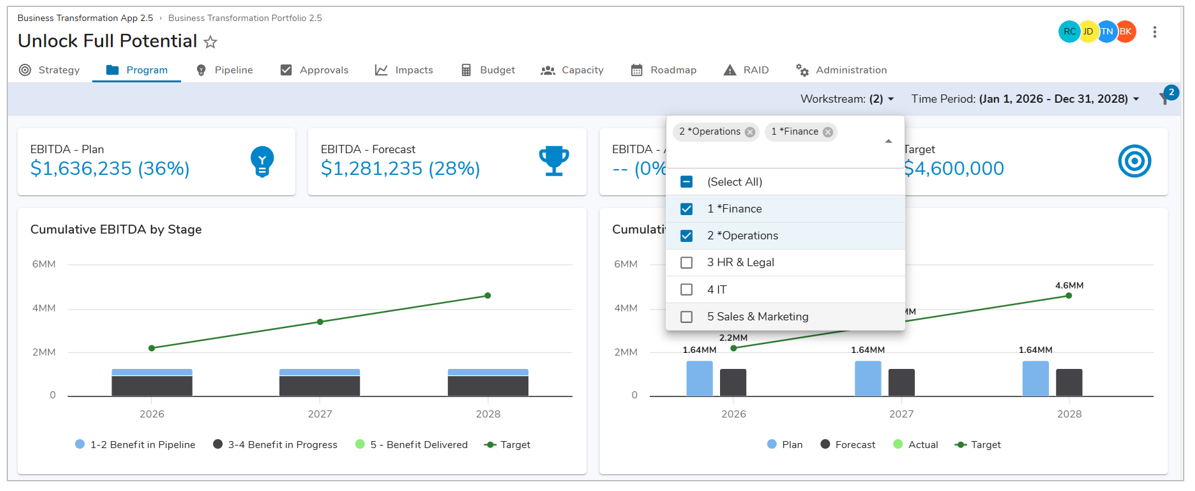
The Data Set Filter allows you to dynamically pivot the metric or attribute Data Set values displayed in sections throughout your solutions.
- Define the Label. Note the Display API Name that can be used in expressions to indicate which data set is being displayed, click “Next”.
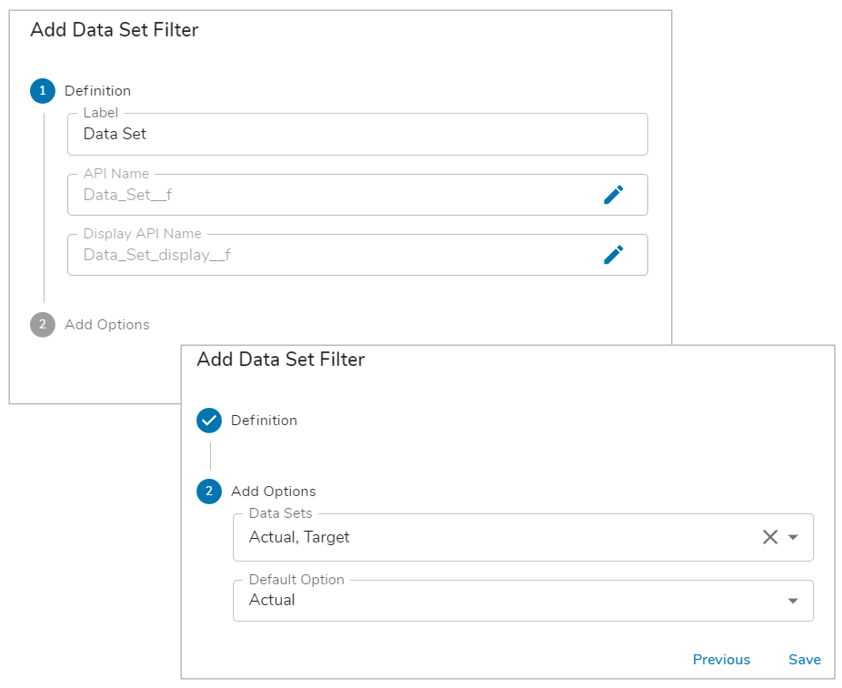
- Select one or more data sets from the drop-down menu. All app-enabled data sets will be available in this menu. From the options selected, define one to be the default value for the Filter (required).
- Save and Publish.
Notes:
- The Data Set Display API Name allows for simple referencing of the data set option that is currently selected for the Data Set Filter via injected expressions.
Required Filter & Default Value
App Admins can configure a Required Filter & Default Value to control how end users will view data on tabs or dashboards.
A Required Filter means the page filter cannot be empty. It requires a default value and removes the option to clear the filter.
A Default Value is the filter value upon page load/refresh. This allows Admins to ensure consistent viewing of chart data for all users.
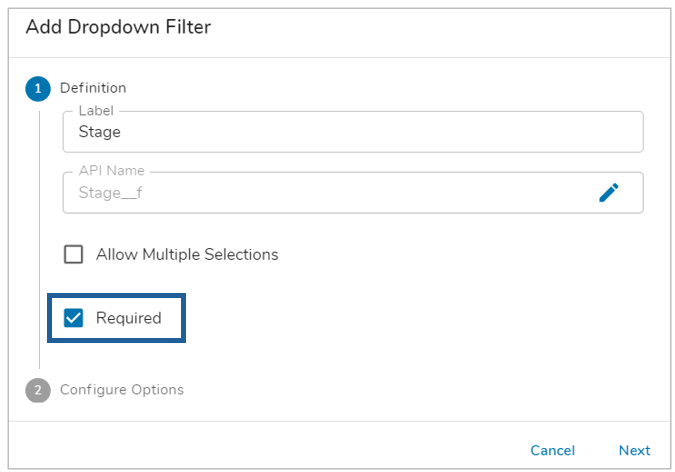
To add a Required Filter & Default Value, go to a template or dashboard. In Configure mode, select the intended filter and choose the Edit option from the drop-down menu. From the Add Filter dialog, toggle the Required checkbox and select Next.
On the Add Options section of the Add Filter dialog, determine which option you would like to set as the Default Value. Once determined, enter the option name surrounded by quotation marks into the Default Value textbox. Some Filters, like the Date Range filter and Data Set filter, will have a dropdown selection for the default value rather than a text field while others can support the use of expressions.
Notes:
- A Page Filter can have a Default Value without being Required, but cannot be Required without a Default Value.
- Multiple Default Values can be assigned to some Page Filters as seen in the example above. The Options should be enclosed in quotations and separated by a semicolon.
- If Multi-select is enabled for a filter, the Default Value can be de-selected. However, the filter will re-populate once the user clicks off the drop-down menu.
Editing and Deleting Page Filters
Filters can be edited or deleted while in Configure mode by clicking on the filter and selecting Edit or Delete.

Filters can be edited or deleted from the Page Filter Panel as well.

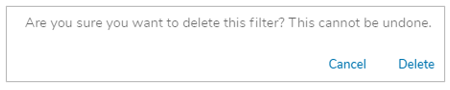
A pop-up window will appear when Delete has been selected on a Page Filter asking to confirm the deletion as seen below.
Toggle into Configure or Display (dashboards only) mode to view fully configured filters.
Configuring Sections to Respond to Filters
Sections can be configured so their data responds to values selected in page filters. For Dropdown, Work Item, Date and Date Range filters, reference the filter API name(s) using the dynamic filter syntax, {!toFilter(API_Name__f)} in section filters. When using a data set filter, it will be available for selection when defining values to display in most sections.
All sections can reference the filter API name(s) in their section title. These can additionally be referenced throughout section configuration where injected expressions are available (column headers, field labels, Form instructions, Alert entries, etc). When a Data Set filter is created, it will be available in sections when selecting which attribute or metric data set to display.
Table, Chart, Card & Board Filtering
Below is a general outline of configuring a Table, Card or Board Section to respond to Page filters.
- Define a page filter on a template or dashboard.
- Open up the Settings dialog for the section.
- Under Filters, select an attribute from the Attribute Name dropdown.
- In the Value Field for the chosen attribute, reference the page filter API name using the dynamic filter syntax. i.e., {!toFilter(API_Name__f)}
- Save.
Examples
- Filter a Table by a Date Range:
>={!toFilter(Filter_API_start__f)} + <={!toFilter(Filter_API_end__f)}
- Filter a Table by a Date Range and return all items when a Date Range filter is empty:
{!if(isEmpty(Filter_API_start__f), "", ">=" & toFilter(Filter_API_start__f) & "+ <=" & toFilter(Filter_API_end__f))}
- Filter a Table by My Role and return items where I have no role when the filter is empty:
{!if(isEmpty(Role__f), "", toFilter(Role__f))}
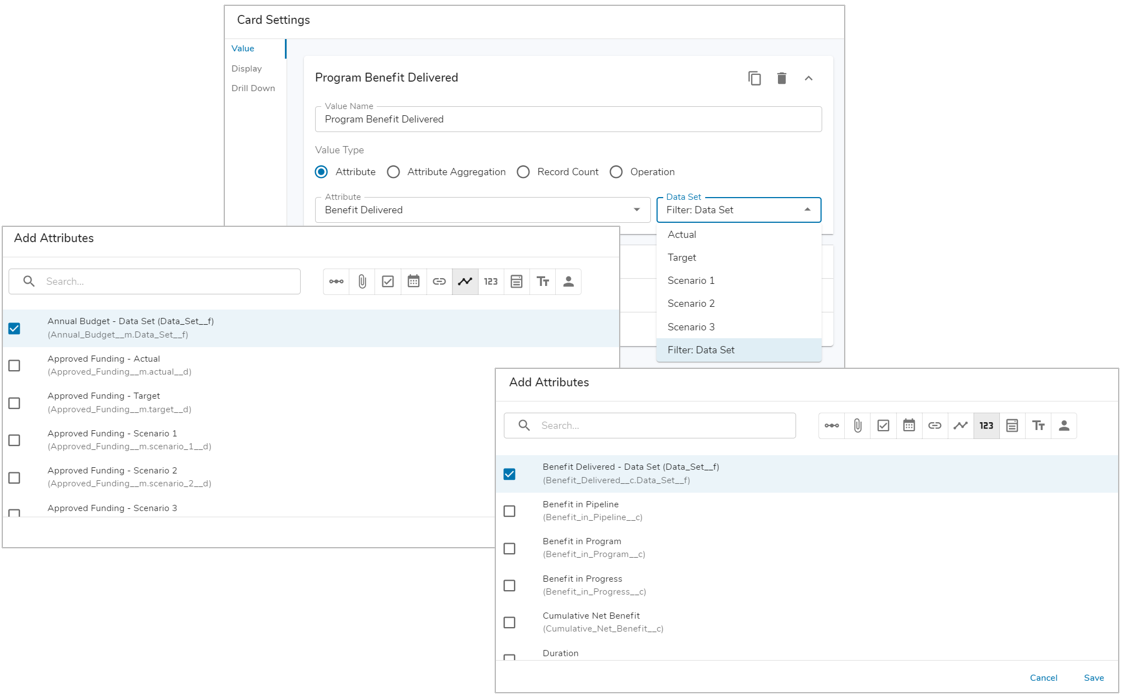
Utilizing the Data Set Filter
To use the Data Set filter in your solution, you must:
- Create a Data Set filter
- Configure a section that can display metrics OR have any data-set-enabled date/numeric attributes and configure a section to display them.
In the below screenshots, note that in the Card and Form configuration dialogs, each attribute is listed out by data set, including the existing Data Set Page Filter. When the data set filter is selected, the values of the data set currently selected in the filter will be displayed in the section.