
This is a Beta Release feature. Configuration and functionality may be modified before formal release.
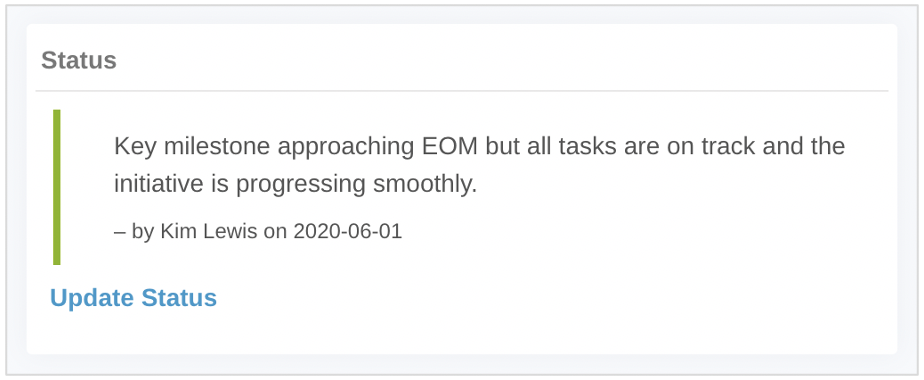
The Status Card section provides a simple interface to allow a user to set the status of a work item. Upon save, the section displays a color-coded status with annotation.
To include a Status Card in your solution:
- On a layout, dashboard or presentation, from Configure mode, click Add Section.
- Select the Category of the Status Card section (this is configurable but is typically: Visualizations).
- Click on the Status Card option to add it to the layout.
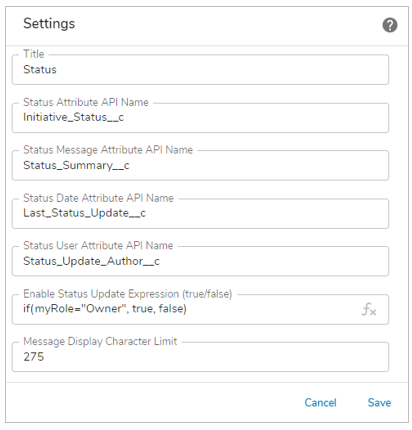
- Click on the settings gear in the top right corner of the section to open the Settings dialog.
- Modify the settings to define the behavior of the Status Card.
- Title: The section title.
- Status Attribute API Name: The API name of the icon/name/value picklist status attribute to be update. The options from the picklist will be available for selection when the status is being updated.
- Status Message Attribute API Name: The API name of the multi-line text attribute that will hold the status message.
- Status Date Attribute API Name: The API name of the date attribute that will hold the date of the status update.
- Status User Attribute API Name: The API name of the text attribute that will hold the name of the user that has updated the status.
- Enable Status Update Expression (true/false): The expression defining an edit-ability rule that must resolve to true in order for the status card to be editable. If you want the Status Card to always be editable this field should be set to: true
- Message Display Character Limit: The number of characters to display for the Status Message. If the content from the Status Message Attribute exceeds the limit, the content will be truncated and suffixed with an ellipsis.
- Save the settings.
Note: There is no validation or typeahead in the fields that accept expressions. If the expressions are not entered correctly, the section will display an error on the instance, dashboard or presentation.
If the Status Card section is being configured on a template, publish and create an instance to view the customized status card. If it’s being configured on a dashboard or presentation, click Stop Editing to view the rendered section.
Prerequisite
The Status Card section must be registered in the App. Please contact your Shibumi Account team to complete the registration.